Adding a new Pedestrians
Entry point into Evacu-agent logic from Traffic3D
The entry point that initiates Evacu-agent logic in Traffic3D can be found in PedestrianFactory.
The method SpawnPedestrian() instantiates a regular Traffic3D pedestrian consisting of:
- A humanoid pedestrian model.
- Walking and running animations.
- Textures for clothing and facial features.
- A
Pedestrianscript.
The Pedestrian script for Traffic3D allows Pedestrians to spawn and then walk or run to a randomly chosen junction.
Upon reaching the road junction they have chosen to cross, the Pedestrian will wait for the appropriate traffic light signal to cross.
After crossing the pedestrian walks to a location and de-spawns.
Evacu-agent logic is then added to the Traffic3D pedestrian and the boolean isUsingEvacuationBehaviour in Pedestrian set to true to turn off Traffic3D pedestrian behaviour so the two sets of logic do not interfere.
Pedestrian types
Pedestrians are divided into Types.
For example:
FriendGroupLeaderPedestrian.FriendGroupFollowerPedestrian.
Each different type models different pedestrians you may see in a high street setting.
The examples above model friend groups who will meet in a location on the map and then travel to various BuildingPedestrianPointTypeBase together.
BuildingPedestrianPointTypeBase are explained in more detail below.
Note the naming convention suffixes:
LeaderPedestrian.FollowerPedestrian.
This is used as all pedestrians in Evacu-agent are in groups, with a group leader and followers.
Groups are explained in more detail below.
Points of interest on the map for Pedestrians
BuildingPedestrianPointTypeBase are places on the map to act as markers for buildings such as food stores and offices.
BuildingPedestrianPointTypeBase extends PedestrianPoint found in Traffic3D with specific types such as ShoppingPedestrianPoint extending BuildingPedestrianPointTypeBase.
Groups
All pedestrian types in Evacu-agent are in groups, which must contain one or more pedestrians.
Group logic is contained in GroupCollection.cs which is responsible for maintaining a List<EvacuAgentPedestrianBase> to represent the members of the group as well as storing the groups List<Vector3> path and Vector3 GroupDestination.
Only one GroupCollection is held by a group, and is placed on the group leader, with members receiving a reference to it.
By having only one GroupCollection per group the group is able to share the same path and path without updating many GroupCollection objects.
Pedestrians simply check the current destination in GroupCollection and make decisions from it, updating it when the currentDestination is reached.
GroupCollection is also used in grouping boid behaviours where pedestrians should apply different spacing behaviour to members of their own group than to members of other groups.
Boid grouping can be viewed in more detail on Boid Grouping.
Adding a new Pedestrian type
Several parts are needed to add a new Pedestrian into Evacu-agent.
The necessary steps have been listed below and then explained in more detail in subsequent lists.
Parts necessary:
- Add a new
Pedestrainprefab. - Create a new
Pedestrianscript. - Create a new
BehaviourTypeOrder. - Create a new
Pedestrian highlight. - Add the necessary scripts to the new
PedestrianGameObjectand set the appropriate values in the Inspector window. - Add a
AbstractEvacuAgentPedestrianFactoryto instantiate thePedestrianat run time. - Add the new factory to
PedestrianFactory.
1. Adding a new Pedestrian prefab object
Creating a prefab for each type of Pedestrian allows AbstractEvacuAgentPedestrianFactory to instantiate them at runtime without large amounts of code.
- Create an empty
GameObjectin any scene by right-clicking the Hierarchy, an appropriate name suffixed with LeaderPedestrian or FollowerPedestrian should be chosen.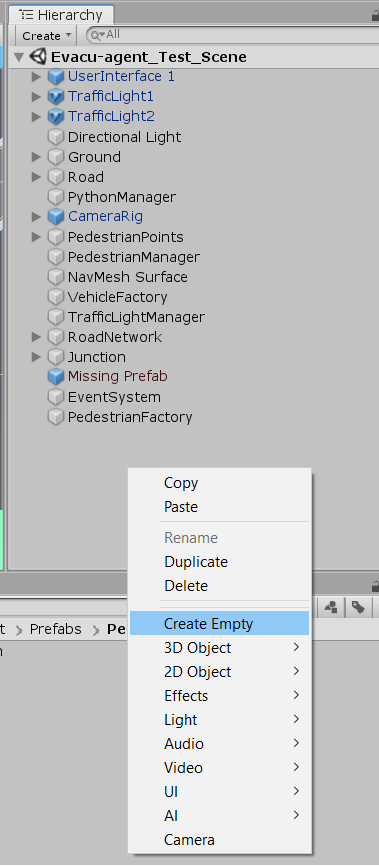
- Drag and drop the new
GameObjectintoAsset/Resources/EvacuAgent/Prefabs/Pedestrian_Typesfrom the hierarchy window.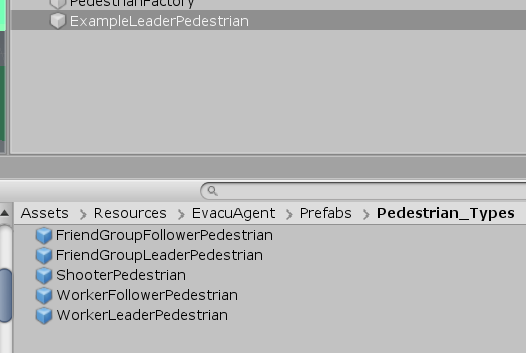
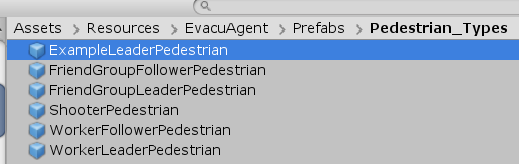
- Double click the new
Pedestrian GameObjectto open the prefab menu and ensure that each Transform component is set to 0 and that each Scale is set to 1 in the Inspector window.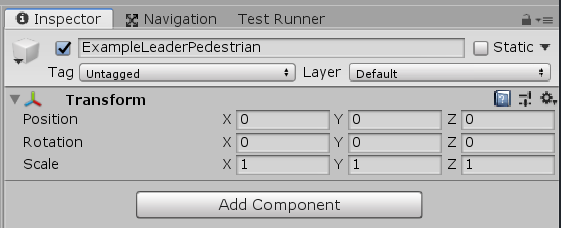
2. Create a new Pedestrian script
Creating new scripts for each Pedestrian has a similar benefit to creating prefabs of each pedestrian in that each can share a large number of properties through extending EvacuAgentPedestrianBase.
- Navigate to
Assets/Scripts/EvacuAgent/PedestrianTypesin the Project window, right click inside thePedestrianTypesfolder and create a newC# script.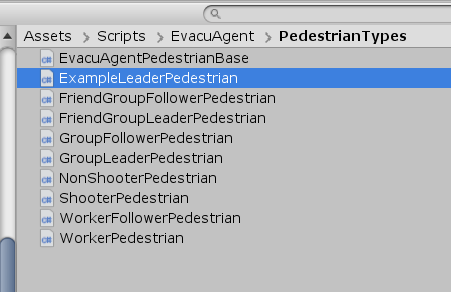
- Double click the script to open it in your IDE and set the script to extend
NonShooterPedestrian.
- If creating a group leader
Pedestrianyou will also need to create a path creator script inAssets/Scripts/EvacuAgent/PathGeneratorsthat should extendNonShooterPedestrianPointPathCreator. - The logic for the new path creator can utilise both
PedestrianPointlocations or random valid locations on the NavMesh. WorkerPedestrianPointPathCreatoris shown as an example below, it simulates aPedestrianwalking to work with a random chance of stopping for coffee before work.- Only group leaders decide on paths for the group currently so non-leader group members do not require a path creator script.
public class WorkerPedestrianPointPathCreator : NonShooterPedestrianPointPathCreator
{
    public override List<Vector3> CreatePath()
    {
        List<Vector3> path = new List<Vector3>();

        if (UnityEngine.Random.value < EvacuAgentSceneParamaters.WORKER_CHANCE_TO_VISIT_HOSPITALITY_POINT_IN_ROUTE)
        {
            path.Add(GetRandomPedestrianPointOfType(PedestrianPointType.Hospitality).GetPointLocation());
        }

        path.Add(GetRandomPedestrianPointOfType(PedestrianPointType.Work).GetPointLocation());

        return path;
    }
}
3. Create a new behaviour type order
- See Behaviour structure.
4. Create Pedestrian highlight
Each Pedestrian is given a highlight, modelled by a small flat circle that appears at the base of the pedestrian feet. This can be toggled by the UI at runtime to more easily distinguish Pedestrian types.
- Create a new empty
GameObjectthe same as in Step 1 with the name prefixed with the pedestrian type and suffixed with the word Highlight. For example:ExampleLeaderHighlight. - This new
GameObjectshould be dragged intoAsset/Resources/EvacuAgent/Prefabs/Pedestrian_Highlights. - Create a new Material by right-clicking in
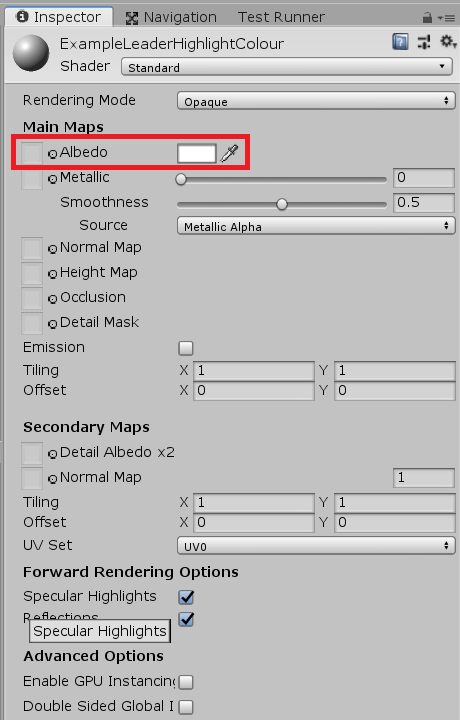
Asset/Resources/EvacuAgent/Materials.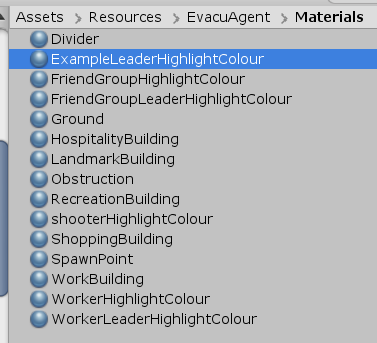
- Change the colour of the new material via the Albedo property, the colour scheme is a darker shade of the same colour for leaders and a lighter shade of the same colour for non-leader members.
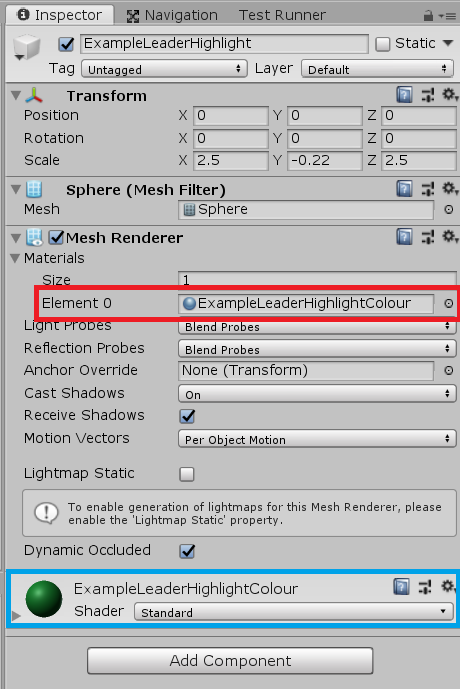
- Open the prefab for the new highlight created in Step 4.2 and apply the material created in Step 4.4 in the material property of the Mesh Renderer, shown in red below. This change should be reflected in the shader property marked in blue.
- Add a tag to the highlight following a naming pattern of:
PedestrianTypeHighlight. For example:exampleHighlight. Note that adding a tag will not apply it to the currently open prefab, a new tag must be created and then manually applied to the new highlight prefab.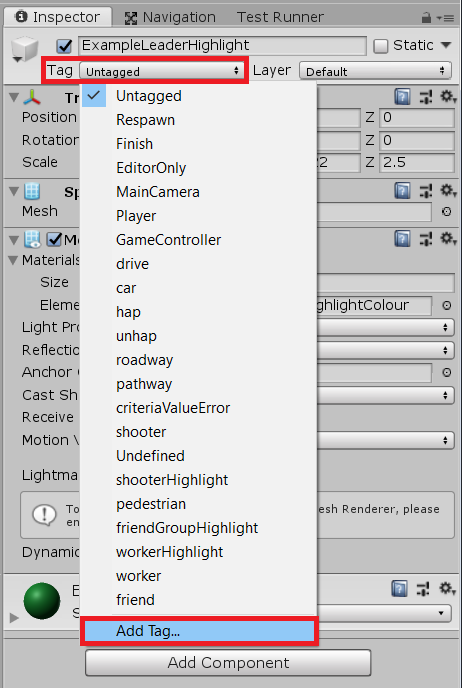
- Add a string value to
EvacuAgentSceneParamatersthat matches the string input for the new tag (case-sensitive). For example:public static string EXAMPLE_HIGHLIGHT = "exampleHighlight";.
5. Add the necessary scripts to the new Pedestrian
- Open the new pedestrian prefab again with the Inspector window open.
- Using the
Add Componentbutton add the pedestrian script created in step 2.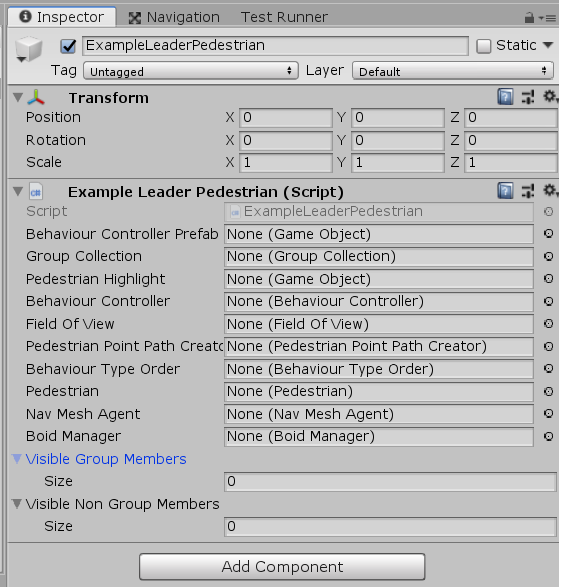
- Populate the
Pedestrianscript as seen below remembering that non-leader group members do not require aPedestrian Point Path CreatororGroupCollection. Scripts must be added viaAdd componentand then dragged to the appropriate slot, prefabs can simply be dragged to the appropriate slot.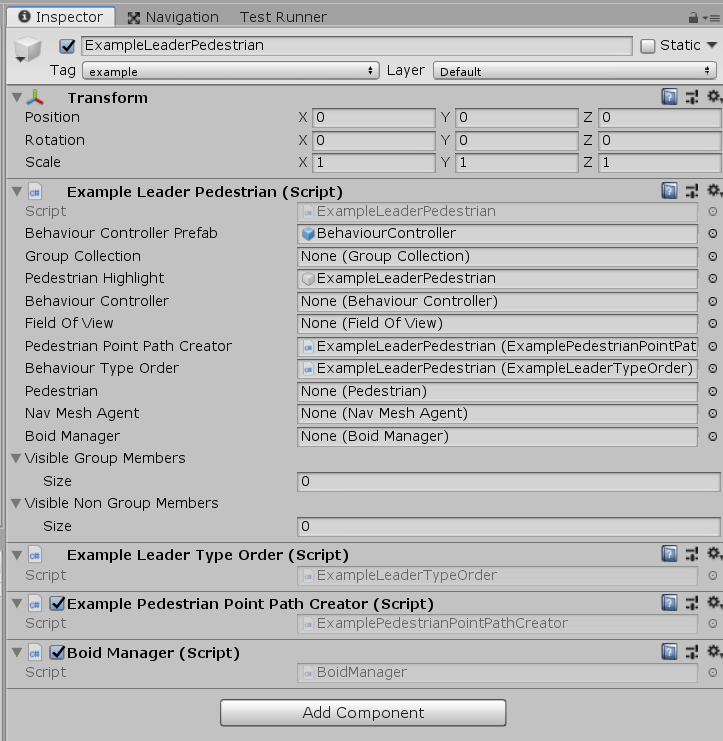
- Please note that
BehaviourStrategyscripts andBoidComponentscripts also need to be added viaAdd Componenthere but have been omitted for brevity. - Add a new tag such as
exampleand apply it to the new Pedestrian prefab. - Add the same string used in the new pedestrian tag to
EvacuAgentSceneParamatersfor examplepublic static string EXAMPLE_TAG = "example";.
6. Add a factory to instantiate the pedestrian
- Add a new script to
Asset/Scripts/EvacuAgent/Factorieswith the naming conventionPedestrianTypeLeaderFollowerPedestrianFactory.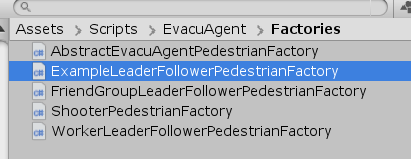
- Open the new factory script in your IDE and make it extend
AbstractEvacuAgentPedestrianFactory. - The factories are similar enough that the methods
Awake()andCreateEvacuAgentPedestriancan be copied into the new factory script. The items that will need to be changed can be seen below.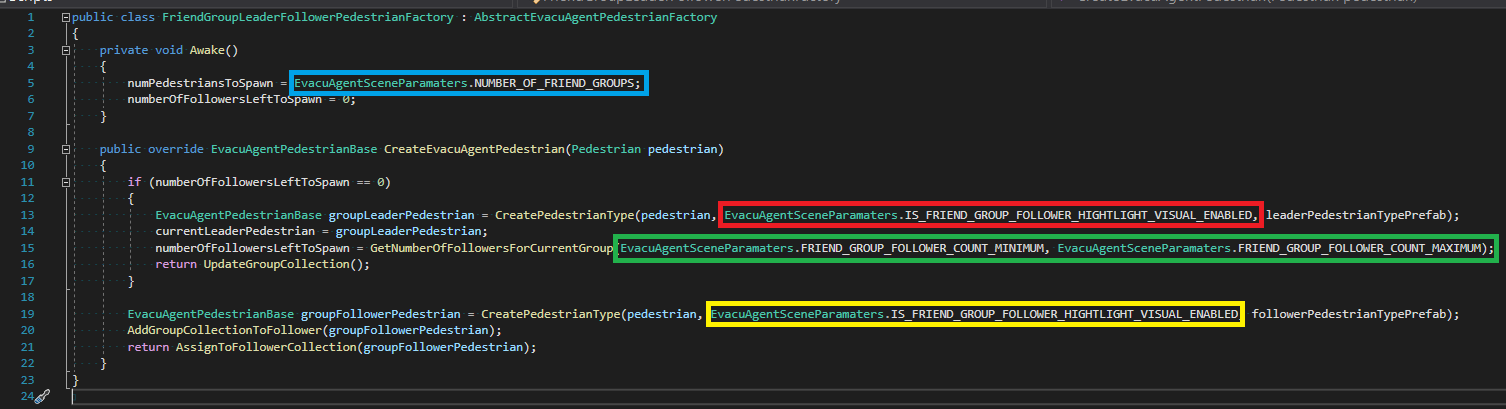
Blueshows the maximum number of groups the factory can instantiate. This needs to be changed by addingpublic static int NUMBER_OF_EXAMPLE_AGENTSwith anintvalue toEvacuAgentSceneParamatersand then changing the new factory script file to the property added inEvacuAgentSceneParamaters.RedandYellowis a bool for if the highlights for this Pedestrian type are currentlytoggled on so that new pedestrians spawned will have the highlight enabled on spawn. This needs to be changed by addingpublic static bool IS_EXAMPLE_HIGHTLIGHT_VISUAL_ENABLEDwith afalsevalue toEvacuAgentSceneParamatersand then changing the new factory script file to the property added inEvacuAgentSceneParamatersfor both references.Greenis the minimum and maximum number of followers or non-leader members a group can have. This needs to be changed by addingpublic static int EXAMPLE_GROUP_FOLLOWER_COUNT_MINIMUMandpublic static int EXAMPLE_GROUP_FOLLOWER_COUNT_MAXIMUMwith aintvalues toEvacuAgentSceneParamatersand then changing the new factory script file to the properties added inEvacuAgentSceneParamaters.- A fully worked example can be seen below:
public class ExampleLeaderFollowerPedestrianFactory : AbstractEvacuAgentPedestrianFactory
{
    private void Awake()
    {
        numPedestriansToSpawn = EvacuAgentSceneParamaters.NUMBER_OF_EXAMPLE_AGENTS;
        numberOfFollowersLeftToSpawn = 0;
    }

    public override EvacuAgentPedestrianBase CreateEvacuAgentPedestrian(Pedestrian pedestrian)
    {
        if (numberOfFollowersLeftToSpawn == 0)
        {
            EvacuAgentPedestrianBase groupLeaderPedestrian = CreatePedestrianType(pedestrian, EvacuAgentSceneParamaters.IS_EXAMPLE_HIGHTLIGHT_VISUAL_ENABLED, leaderPedestrianTypePrefab);
            currentLeaderPedestrian = groupLeaderPedestrian;
            numberOfFollowersLeftToSpawn = GetNumberOfFollowersForCurrentGroup(EvacuAgentSceneParamaters.EXAMPLE_GROUP_FOLLOWER_COUNT_MINIMUM, EvacuAgentSceneParamaters.EXAMPLE_GROUP_FOLLOWER_COUNT_MAXIMUM);
            return UpdateGroupCollection();
        }

        EvacuAgentPedestrianBase groupFollowerPedestrian = CreatePedestrianType(pedestrian, EvacuAgentSceneParamaters.IS_EXAMPLE_HIGHTLIGHT_VISUAL_ENABLED, followerPedestrianTypePrefab);
        AddGroupCollectionToFollower(groupFollowerPedestrian);
        return AssignToFollowerCollection(groupFollowerPedestrian);
    }
}
7. Add the new factory to PedestrianFactory
- Any scene that spawns
Pedestrianneeds to have a singleGameObjectwith aPedestrianFactoryattached to it as well as specific EvacuAgent factories such asWorkerLeaderFollowerPedestrianFactory. - To enable new
Pedestrianto be spawned use theAdd Componentbutton on thePedestrianFactoryGameObjectto add the factory made in Steps 5.1 to 5.6 dragging and dropping the appropriate prefabs as seen below. Note that pedestrians that are only have leaders are allowed but both boxes must be set as the leader pedestrian.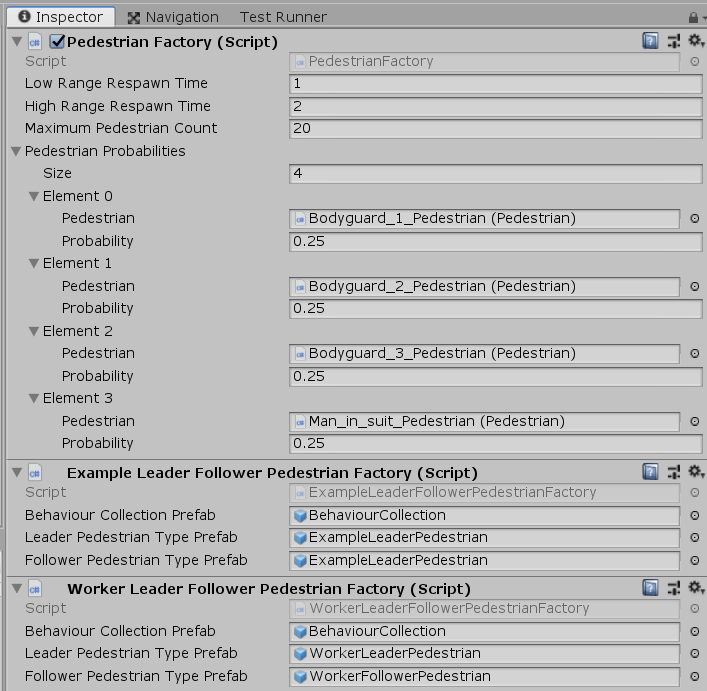
- In
PedestrianFactory.SetUpEvacuAgentPedestrianFactoriesaddgameObject.GetComponent<ExampleLeaderFollowerPedestrianFactory>(). Note that commenting these factories out allows you to spawn only specificPedestriantypes for easier debugging.
private List<AbstractEvacuAgentPedestrianFactory> SetUpEvacuAgentPedestrianFactories()
  {
      return new List<AbstractEvacuAgentPedestrianFactory>()
      {
          gameObject.GetComponent<WorkerLeaderFollowerPedestrianFactory>(),
          gameObject.GetComponent<FriendGroupLeaderFollowerPedestrianFactory>(),
          gameObject.GetComponent<ExampleLeaderFollowerPedestrianFactory>()
      };
  }